Saturday, April 08, 2006

Extended Hiatus

To my faithful readers (all six of you!), I obviously have not paid much attention to this blog over the last couple of months. I blame a time-consuming but enjoyable job and a renewed focus on my other love, photography.

I was lucky enough to get two of my Holga images selected for a juried show as part of Houston's FotoFest celebration, and since then I've been asked to be a featured artist for a toy camera magazine. Never one to look a gift horse in the mouth, I've turned my non-work energies to shooting and processing film. Go here if you'd like to look at a few images of mine in a gallery on a toy camera site.

I really like blogging about cooking (I still cook almost every day) so I'll leave this blog live but probably won't post again for several months. Eat well and see you later!

Monday, January 30, 2006

Three-Cheese Pizza with Onion, Sage and Rocket

Okay, I'm back. It's been awhile but I'm committed to a once-a-week posting from now on.


I'd never had much experience with homemade pizza, but I started seeing these really great-looking recipes. Making crust from scratch seemed a bit much, but then I stumbled upon frozen raw dough at the grocery. At Whole Foods, it's sold in pound lumps, whole wheat or white and is pretty cheap. It took me awhile to find the best way to work it, but now I've got it down. About four hours before cooking time, I take the dough out of the freezer, put a piece of wax paper on a rack, spread a bit of flour on it, take the dough out of its wrapper and sit it on the floured paper. Then I go back to work or do the laundry or read the paper.

When I'm ready to work the dough, I lay out my handy pastry mat, spread a little flour on it and punch the dough. I'll flatten it into a wheel about six inches across then drop it over my fist to let gravity pull the sides down. Then I'll handle it like a steering wheel, gripping the edges, turning it round and round, letting it stretch to twelve inches across. If it shrinks when I lay it down, I'll cover it with a dish towel for five or ten minutes so it can rest or catch its breath. Then I'll do the steering wheel bit again, and it usually stretches right out to 12 or even 14 inches. Once it's the size I want, I'll transfer the dough to a polenta-dusted piece of aluminum foil. More on this later.

I'll let it sit while I prep the ingredients, then I'll assemble the pizza. Once the pizza is assembled, transfer the pie, still on the foil, to a very hot pizza stone that's been pre-heating in the oven (didn't I mention that?). It's easy to move the pizza around on the foil and keep from burning yourself. Some use a wooden peel; I'm looking at one of those. Cook the pizza, then using the foil, move it from the pizza stone to a cutting board. Thanks to the polenta, the pizza slides right off the foil.

Tonight's pizza comes from Epicurious, but I've modified it a bit, as usual. We liked it, and I'll have leftovers for lunch tomorrow!

Tuesday, January 03, 2006

Culinary Books for Christmas

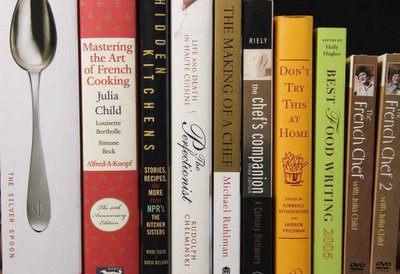
Santa was very good to me this year and brought me lots of books about food and cooking. I don't want any more cookbooks (I did get two but both are classics); between what I've got, online sources and blogs I read, I'm done with cookbooks for now, thanks.

I can't say yet if I have a favorite, but I'm very excited about The Silver Spoon, a 50-year standby in Italian kitchens. It has just been translated into English for the first time.

Julia Child was a little before my time but I have an aunt who's devoted to her methods, and with all the hype about the Julie/Julia project, I thought I should take a look. I received both the first volume of Mastering the Art of French Cooking and DVDs of The French Chef, her show on public television.

I have started reading Michael Ruhlman's The Making of a Chef, a chronicle of his time at the Culinary Institute of America. It's a great read so far, and I think it provides a good perspective on that school, although he gets a bit emotional at times. Having worked in hotel food service with CIA graduates, I know feelings both for and against the school run high.

The Perfectionist, by Rudolph Chelminski, is a book about the life and death of a well-known French chef Bernard Loiseau, who committed suicide in 2003 ahead of declining ratings by GaultMillau and the rumoured loss of a Michelin star.

Other goodies:
The Chef's Companion, by Elizabeth Riely
Hidden Kitchens, from The Kitchen Sisters
Best Food Writing 2005, edited by Holly Hughes
Don't Try This at Home, edited by Kimberly Witherspoon

Saturday, December 24, 2005

Sauteed Foie Gras with a Balsamic-Red Currant Sauce

Sauteed Foie Gras with a Balsamic-Red Currant Sauce
Recipe
My good husband introduced me to sauteed foie gras (as opposed to the foie gras in terrines that are served room temperature), and I've become a convert. We've eaten it in several restaurants over the years, and I made it for the first time last New Year's Eve and I was somewhat successful in my execution of the dish. We decided we wanted it again but I needed a better recipe. The one I used last year wasn't really what I wanted. After some searching, I cobbled together enough information to write up my own.

Some learnings:
  • Buy it from a reputable butcher or specialty store who knows how to handle it and prep it for you. In Boston, I use the Butcher Shop.
  • Limit handling of foie gras. The heat from your hands makes the fat-laden liver start to melt.
  • If the butcher hasn't deveined it for you, devein using two knives. The vein, while edible, has a texture so different from the liver that it's very noticeable when eaten.
  • If it breaks into pieces, oh well. Cook them and reassemble when serving.
  • Flouring the liver helps it keep its shape when cooking.
  • If serving on a slice of bread, select a bread type that's soft and has a soft crust (or cut the crust off), and slice the bread thinly.
  • It cooks REALLY fast so be prepared to eat about four minutes after you begin cooking.
  • Any berry-laden jam could work; red currant is just a favorite of mine.

(Sort of) Southern Cornbread

I grew up in the South, and no self-respecting Southerner puts sugar in their cornbread. We eat cornbread as a bread, not as a dessert. We eat it with stews and soups, so it's supposed to be savory. Corn muffins, on the other hand, are supposed to be sweet, so you eat them when it's appropriate to eat sweet stuff, like at breakfast or for a mid-afternoon snack with your coffee at Starbuck's. You wouldn't eat a blueberry muffin with your beef stew, so why would you eat sweet cornbread with your barbeque?

I used to make a great savory cornbread from a cookbook my brother gave me a long time ago called White Trash Cooking by Ernest Matthew Mickler. This type of cornbread is an acquired taste, as it's savory (no sugar) and dry (no flour), and you eat it by crumbling it into whatever else is on your plate or in your bowl. (And the cookbook is a classic!). White Trash Cooking Cornbread Recipe

Then I married a Yankee who didn't like my Southern cornbread. That took a bit of getting used to. If he didn't like my cornbread, what kind of future did we really have? I got over that useless bit of navel-gazing pretty quick, and started hunting for cornbread we could both like.

It took some searching, as most cookbooks out there feature sugar, and a lot of it, in their cornbread recipes. Even the usually reliable Cook's Illustrated published a cornbread recipe they called Southern that was way too sweet. I finally found the solution in the Joy of Cooking, and it's become my everyday cornbread recipe.


It's got a tablespoon of sugar, just enough to appease the my good husband's cornbread sweet tooth but not enough to detract from the savory taste. Cooking the batter in bacon fat in a cast iron pan helps keep it authentic for me. I'll chop of two slices of bacon and fry them in the cast iron, then scoop out the bits and drain almost all of the fat from the pan, leaving a scant tablespoon. I'll add most of the bacon to the batter, and sprinkle the rest on about halfway through cooking. It's good cornbread and a great compromise.

One last thing - cornbread freezes really well. Each batch makes six pieces, and we can never eat them all at once. I'll wrap each individual piece in heavy freezer wrap, then put all the pieces in a freezer zip-storage bag, then I can pull out however many pieces I need later on. They thaw in about 90 minutes on the counter, then I put a pat of butter on each piece, wrap them in foil and put them in the toaster over to warm for 15 minutes or so.

Tuesday, December 20, 2005

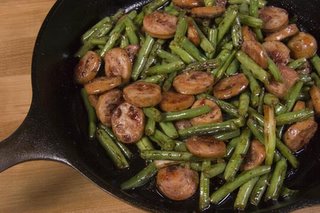
Spicy Charred Green Beans with Scallions

Spicy Charred Green Beans with Scallions
Recipe
This is a fab dish and is especially useful when the green beans in the fridge are past their prime. Plus it's spicy and vegetable-y and just really eatable. I got the recipe from Cook's Illustrated originally but I've tweaked it a bit and added sliced cooked sausage to it to make it a one-pot meal.

The secret - the cast iron pot (I have an old Lodge that I've seasoned myself). It gets hot enough to char the beans without overcooking them, and it gives them a great flavor. I've never cooked this dish in anything other than my cast iron; I doubt the non-stick could get hot enough to cook the beans without turning them into mush, and I bet the beans and especially the fragile scallions would stick to a standard non-coated frying pan.

I love, love, love my cast iron pot. Mark Bittman, esteemed food writer, recently extolled the virtues of cast iron in one of his recent columns in the New York Times. My good husband looks askance at it everytime I pull it out because it does in fact require a little maintenance to keep it so useful and there are a few rules of engagement. Mostly, keep tomatoes and vinegary sauces out of it, as the acid eats through the seasoning (a small amount won't hurt it), and don't let it stay wet or it will rust (it is just pig iron, after all). After cooking in it, I rinse it out with very hot water, then scrub it with a heavy wooden-headed metal brush (used only for this purpose). I put a little oil in it, put it over low heat and let it sit for five minutes. I lightly rub it out with a paper towel and it's ready for its next job. It cooks so nicely and adds such great flavor to just about anything.

A warning - pets love the seasoning of cast iron. I keep mine on the open bottom shelf of our butcher block island, and I have to keep a lid on it or my cat will lick the finish right off the pan, making little unseasoned patches in the pot. It won't hurt him - it's just a little iron and a little fat - but those naked patches of cast iron equate to sticky spots when cooking.

Thursday, December 15, 2005

Cooking from the Center

I didn't work this year from mid-January to October. When I wasn't planning my wedding, getting married or job-hunting, I was thinking about cooking, reading books and blogs about cooking, and yes, actually cooking. Since I wasn't working, I had the luxury of time and I chose to spend a lot of it in the kitchen, and I've had a lot of people ask me why.

I found cooking to be a great creative outlet and a very meditative process. I could get in a good mental groove chopping vegetables or stirring risotto or sorting through the week's farm share. I rarely felt drained by cooking; it seemed like cooking gave me more energy than it took from me. It felt effortless, like what I was meant to do. I'd found my cooking center.

Now that I'm working full-time again, I had to scale back my weekday cooking. Believe me, I didn't want to but after several poorly-executed meals and a minor meltdown, I realized I had to. So now I'm trying to cook interesting but not-too-complicated food in less time. I make and freeze soups and stews on the weekends to eat during the week, and search my archives and the web for quick but good dishes for weeknight dinners. I was frustrated by the constraints but now I realize it's just an opportunity to re-center. And since we're always having to re-center ourselves as our lives change, it's good practice too.

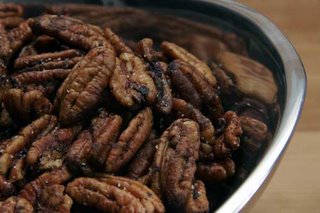
Savory Spiced Pecans

This is my annual Christmas treat. I make pounds of them and give them away, to universal acclaim. The recipe came out of a cookbook my grandmother used to give every woman in the family upon her wedding called "The Stuffed Griffin," published in 1976 by The Utility Club in Griffin, Georgia, a small-town volunteer organization. It's a hoot to read, but pretty useful too.


Heat the oven to 250 degrees. While the oven is preheating, melt a stick of butter (no substitutes) in a large baking dish (a lasagne pan is good but bigger is better) in the oven. When the butter is melted, stir in a half-cup of Worcestershire sauce. Add 1.5 pounds of pecan halves and stir well, until all pecans are coated in the liquid. Pieces would work too but aren't nearly so nice to look at. Place in the oven and stir every fifteen minutes; it should take an hour for the nuts to absorb all the liquid.

Spread the nuts on paper towels to drain and dry. Sprinkle with salt and cayenne to taste. I've found the nuts can stand a fair amount of both. Once they're cooler and dry to the touch, store them in ziploc bags or plastic storage containers with tight lids.

A note on nuts: I live in Boston where you can't find a decent pecan to save your life (I've had people point me to walnuts when I ask for pecans - I swear!), so I order them every year from McEachern Pecans, a small farm in south Georgia, pecan-growing capital of the world! Pecan season is in the fall, so order in November for this year's crop.

Saturday, December 10, 2005

Pasta with Lentils and Sausage

I've been trying to dumb down my weeknight meals so they don't take three hours and a Ph.D. to prepare. Now that I'm working full time again, I just don't want to spend hours in the kitchen after spending hours at my desk. But it's hard to quash my enthusiasm for cooking; I want to make something interesting and good, and leftovers don't always qualify as either. So I try to find the balance between cooking a little but cooking well.

One night this week I made a pasta dish with lentils and sausage. You can use any kind of sausage you like except for the really esoteric ones like lamb and apricot (I have that in my freezer and haven't figured out quite yet what to do with it). I used a pre-cooked andouille because I thought it would pair nicely with the lentils and the tomatoes in the sauce, but any robust sausage would do, like kielbasa or Italian.

So brown the sausage in a bit of oil in a Dutch oven. Add a small can of diced tomatoes, a chopped onion, some chopped carrot, several pressed cloves of garlic (don't be shy) and some dried rosemary. Saute it all until it starts to smell really good, then add just about two quarts of water (I substituted about a cup of the water with some big red wine) and two cups of lentils. Bring it to a boil, then reduce the heat and let it simmer for 45 minutes. At some point, I stuck my immersion blender in the pot to thicken it up a bit.

I cooked up some farfalle to go with it, and added it right at the end and let it all sit together for a few minutes. But it didn't work well as a leftover (for lunch) because the pasta got mushy. Next time, I'll spoon pasta in the bottom of each person's bowl, then ladle the lentils over it. That will mean no pasta in the leftovers but no pasta is better than mushy pasta!

It was good and it was quick, satisfying my need for a tasty dinner without killing myself.